In addition to the manual remediation actions that you can take inside Microsoft 365 Defender, you can also configure different levels of automated responses, both integrated within Microsoft 365 Defender and other automation tools.
Automated Investigation and Response
If you have subscribed to MDE P2 or MDB, you have native options for automated remediation. If your organization has MDE P2 or MDB, fully automated remediation is enabled by default in tenants created after August 16, 2020. Automated remediation only supports devices later than Windows 2012 R2 and Windows 10, version 1709.
If you want to limit the amount of automated remediation performed by Microsoft 365 Defender, you can create device groups to limit the level of automated remediation.
Note
You can only use device groups to limit remediation in MDE P2. MDB customers have fully automated remediation enabled by default and cannot use device groups to manage it.
To create and manage remediation levels using device groups, use the following steps:
- From the Microsoft 365 Defender portal (https://security.microsoft.com), go to Settings | Endpoints. Under Permissions, select Device groups, as shown in Figure 9.60:
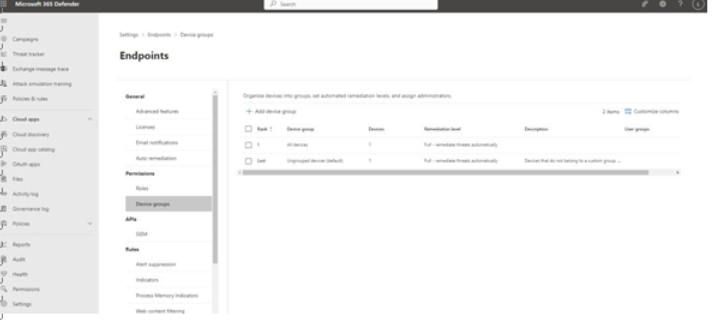
Figure 9.60 – Device groups
- Click Add device group.
- On the General page, specify a device group name.
- Under Remediation level, select the level of automated remediation to apply to this group. Options include Full – remediate threats fully (default), Semi – require approval for core folders, Semi – require approval for non-temp folders, Semi – require approval for all folders, and No automated response.
- Enter a description.
- Click Next.
- On the Devices page, use the filters to craft matching rules that will be used to define the membership of the group. You need to specify at least one matching criterion. Click Next.
- On the Preview devices page, click Show preview to return a sample list of devices that will be included in the group. Click Next.
- On the User access page, select groups to which you want to restrict access. If you don’t want to limit access to these devices inside Microsoft 365 Defender, leave this blank.
- Click Submit.
After at least one device group has been defined, you can go to Settings | Endpoints | General | Auto remediation to update the parameters for auto-remediation for custom device groups and the default device group named Ungrouped devices.
Power Automate
In addition to working with native automated remediation features inside Microsoft 365 Defender, you can also create Power Automate flows based on Microsoft Defender triggers.
Microsoft Defender provides three triggers to Power Automate:
• When a new remediation activity is created
• When an alert is generated
• When a new WDATP alert occurs
You can use these notifications to create a variety of flows using Microsoft 365 Defender actions, Azure AD actions, or any other actions supported in the Power Automate service. For example, you could create a flow that automatically runs the Collect Information Package action on a device, retrieves statistics for an IP address, executes the Restrict app execution remediation task, or blocks a user account.
Further Reading
For more information on configuring Power Automate flows with Microsoft 365 Defender, see https://learn.microsoft.com/en-us/microsoft-365/security/ defender-endpoint/api-microsoft-flow.